-
Import Subscribers”‹
-
Create your first campaign”‹
-
Create sites & forms
-
Get started with automations”‹
Import Subscribers
A segment in Sendimpactt is a dynamically generated list of subscribers based on specific conditions, allowing you to target or organize particular audiences within your mailing list effectively. Here’s a comprehensive guide on creating, using, and managing segments:
Creating Segments:
- On the Subscribers page, under the All subscribers tab, apply the filter(s) that will define the conditions of your new segment.
- Once you’ve set the conditions, a green “Save as segment” button will appear. Click it to save all the subscribers who meet these conditions into a segment.
- Pay attention to whether you are creating “and” rules or “or” rules when setting conditions. Subscribers need to meet all “and” conditions or at least one “or” condition to be included in the segment.
- All past and future subscribers who meet the defined conditions will be automatically included in the segment.

Using Segments:
- Segments can be used as recipients of any campaign, or excluded from a campaign if you wish certain subscribers not to receive a particular newsletter.
- To include a segment in a campaign, simply select the segment as recipients during campaign setup.
- To exclude a segment from a campaign, click the “Exclude segment” button next to the segment you do not want to receive that newsletter. Note that exclusion supersedes inclusion if a subscriber belongs to multiple segments.
Using Segments in Automations:
- In automation workflows, you can use segments as conditions to alter the outcome of the workflow based on subscriber behavior.
- Add a Condition step to your workflow and set the condition as Segment membership, selecting the segment you wish to use as the condition. This will split your workflow into two paths based on whether subscribers are included in the segment or not.
Troubleshooting Segments:
- If your segment isn’t working as expected, ensure that you’ve correctly created the filters using the appropriate “and” or “or” options.
- Double-check that subscribers meet the filter conditions by reviewing their profiles, accessible by clicking on their email address and scrolling down to Subscriber details.
Deleting Segments:
- To delete a segment, navigate to the Subscribers page, then click on the Segments tab.
- Select the segment(s) you wish to delete and click Delete. Note that deleting a segment only removes the segment itself, not the subscribers inside it.
Exporting Subscribers by Segment:
- To export subscribers by segment, navigate to the Segments tab within the Subscribers page.
- Click View segment for the desired segment.
- Click the Export button and select your preferred file type.
By effectively utilizing segments in Sendimpactt, you can tailor your email marketing efforts to specific subscriber groups, improving engagement and relevance.
Importing subscribers into SendImpactt is a seamless process that offers flexibility and convenience. Here, we’ll outline the top three methods for importing subscribers:
- From a CSV or TXT file:
- Navigate to the Subscribers page and click on “Import”.
- Select it from your computer.
- Click Import subscribers.
- Proceed to the Import settings page to further customize the import.
- Manually adding a single subscriber:
- Select the Add subscriber tab.
- Fill out the subscriber’s Email and Name fields.
- Optionally, add more fields
- Click Save finalize the process.

After uploading your subscriber list, you’ll be prompted to adjust import settings, including assigning subscribers to specific List and matching columns in your spreadsheet to fields in Sendimpactt.
It’s essential to verify that all subscribers have provided explicit permission to receive emails. Sendimpactt automatically removes duplicate email addresses to ensure recipients don’t receive duplicate newsletters.
Importing subscribers does not trigger double opt-in confirmation emails, as it’s assumed you’ve already obtained consent from your subscribers.
Here are some additional tips and considerations:
- Server’s max upload file size is limited to 1024M. Make sure your input file does not exceed this limit.
- Acceptable file type is CSV with a header row containing the column / field names like EMAIL, FIRST_NAME, LAST_NAME…
- You can download a sample input file here (Sample.csv)
- All information should be contained within one sheet in the spreadsheet.
- Avoid leading or trailing spaces in records.
- Review the import summary to identify any failed imports and reasons for failure, such as invalid email addresses or unsubscribed status.
Create your first campaign
How to create and schedule a campaign
Create your email campaign in aneasy and visual way. In this article, we will see how to create, design, and schedule your email campaign with thecampaign creation flow.
- Go toCampaigns
- ClickCreate an email campaign.
- The Create an email campaign page opens and has two options Regular and Plain Text.

4. Choose campaign accordingly then click on next.
5. Choose the list/audience you want to send this campaign.
- Fill the basic setup tab and then click on next.
- After clicking next you will see the tab to choose the template. Edit your email according to requirement and then click next
- In this step select the time to send the email.
- In this step review and send/schedule your email campaign.


Create sites & forms
Sendimpactt landing pages are powerful tools for growing your Contact List and promoting your products and services. With published landing pages, you can easily share them on the web or in other Sendimpactt campaigns, allowing you to drive traffic and engagement effectively. If your landing page includes a signup form, you can even tag anyone who subscribes.
Here’s how to create and manage a landing page in Sendimpactt:
To Create a Landing Page
Start by naming your landing page and choosing an Contact List. If your landing page includes a signup form, new subscribers will be added to this Contact List.

Follow these steps to create your landing page:
- Click on “Signup Forms”.
- Choose “Landing Page.”
- Enter a name for your landing page. This name is for internal reference only.
- Select an Contact List from the drop-down menu where new subscribers will be added.
- Choose the “Base Template”
- Click on “Start Design”

Design Your Content
Customize your landing page by adding or editing content blocks as needed. Preview your page to ensure it looks the way you want.
Here’s how to design your landing page:
- Choose the template that best fits your needs.
- Customize or add content blocks to your layout.
- Click “Preview” to see how your page will look.
- After customizing your content, click “Save & Close.”
Edit Page Title and URL
Edit your landing page’s title, URL, and favicon to ensure they accurately reflect your content.
Follow these steps to edit your page title and URL:
- In the “Page Title and Site Icon” section, click “Edit Title And Icon.”
- Enter the title you want visitors to see in their browser’s title bar.
- Click “Save.”
Edit Social Share Preview
Customize the title, description, and image for social media previews when your page is shared.
Follow these steps to edit your social share preview:
- In the “Social Share Preview” section, click “Edit Preview.”
- Enter the title and description for your social post previews.
- Upload or replace the image for your social post preview.
- Click “Save.”
Edit URL
Choose a custom domain or a Sendimpactt domain for your landing page URL.
Follow these steps to edit your URL:
- In the “URL” section, click “Edit URL.”
- Choose between using a custom domain or a Sendimpactt domain.
Select the domain from the drop-down menu and enter the rest of the URL. - Click “Save.”
Edit Contact List and Tags
Confirm or change the Contact List associated with your landing page, and add tags if necessary.
Follow these steps to edit the Contact List and add tags:
- In the “Contact List and Tags” section, click “Edit Contact List.”
- Confirm the correct Contact List from the drop-down menu.
- Click the plus icon (+) to add up to 5 tags.
- Click “Save.”
Edit Settings and Tracking
Add tracking options like Sendimpactt tracking, Meta Pixel, or Google Analytics to your landing page.
Follow these steps to edit settings and tracking:
- In the “Settings & Tracking” section, click “Edit.”
- Click “Accept” to confirm your agreement to additional terms.
- Check the boxes for the tracking options you want to enable.
- Click “Save.”
Publish Your Landing Page
When you’re ready to make your landing page live, click “Publish.”
Here’s how to publish your landing page:Click “Publish.”
Confirm your decision by clicking “Publish” in the pop-up modal.
After publishing, your landing page will be live on the web, but unindexed. You’ll need to share the link to drive traffic to your page.
After You Publish
Once your landing page is live, it’s time to promote it, view reports, and manage it as needed.
- Promote Your Page: Share your landing page with your contacts through campaigns, social media, or ads.
- View Reports: Monitor your landing page’s performance and track visitor engagement.
- Show Ads: Create retargeting ads for visitors who interact with your landing page.
- Target Subscribers: Use tags to segment your Contact List and create targeted campaigns.
- Manage Landing Pages: Edit, unpublish, or delete your landing pages as needed.
That’s it! You’ve successfully created and published your landing page in Sendimpactt. Now you can start driving traffic and achieving your marketing goals
A pop-up form is usually a small window with a message that appears while a visitor is browsing your website. They’re an excellent way to promote your newsletter and collect subscribers.
Setting up a popup form is a straightforward task.
- Simply click on “Create New Popup,” (Signup Form> Create Popup)

- After selection then on the next screen:
- Please write the unique name of the form
- Select the mail list for which you want to build the form
- Select the available template.
- Select the templates that suit your preferences and click on it. If you have a change of heart, you can always modify the layout using the design editor.
In the Form settings, you can set up when you want your pop-up to appear on your website.
Form settings let’s you:
- Change the Form Name.
- Change the List Name
- Adjust the overlay opacity by default kept at 50%
- Display: Configure how the form shows up to the hosting web page in the following ways:
-
- On page load: Load the form immediately when the webpage is loaded
- On page First visit: Load the form immediately when the webpage is loaded but for the first page visit only
- After page load: Load the form after a period of time
- You can set the Wait time (in seconds)
- Show form only when a user scrolls through a specific percentage of the page.
- Enable the popup when a user is trying to leave the page.
-
- On click: Load the form when a specified element is clicked

After the subscription form is fully designed – click the “Save and continue” button on the top right side.
Please note: To verify whether your form is successfully linked to your site, please connect your site in the site management section. You will find the option to connect your website within the form design editor as well.

How to create an embedded form
Creating an embedded form in Sendimpactt follows a similar process to creating a pop-up form, with a few distinctions:
- Navigate to the “Sign up Forms” section and click on the “Embedded Form”..
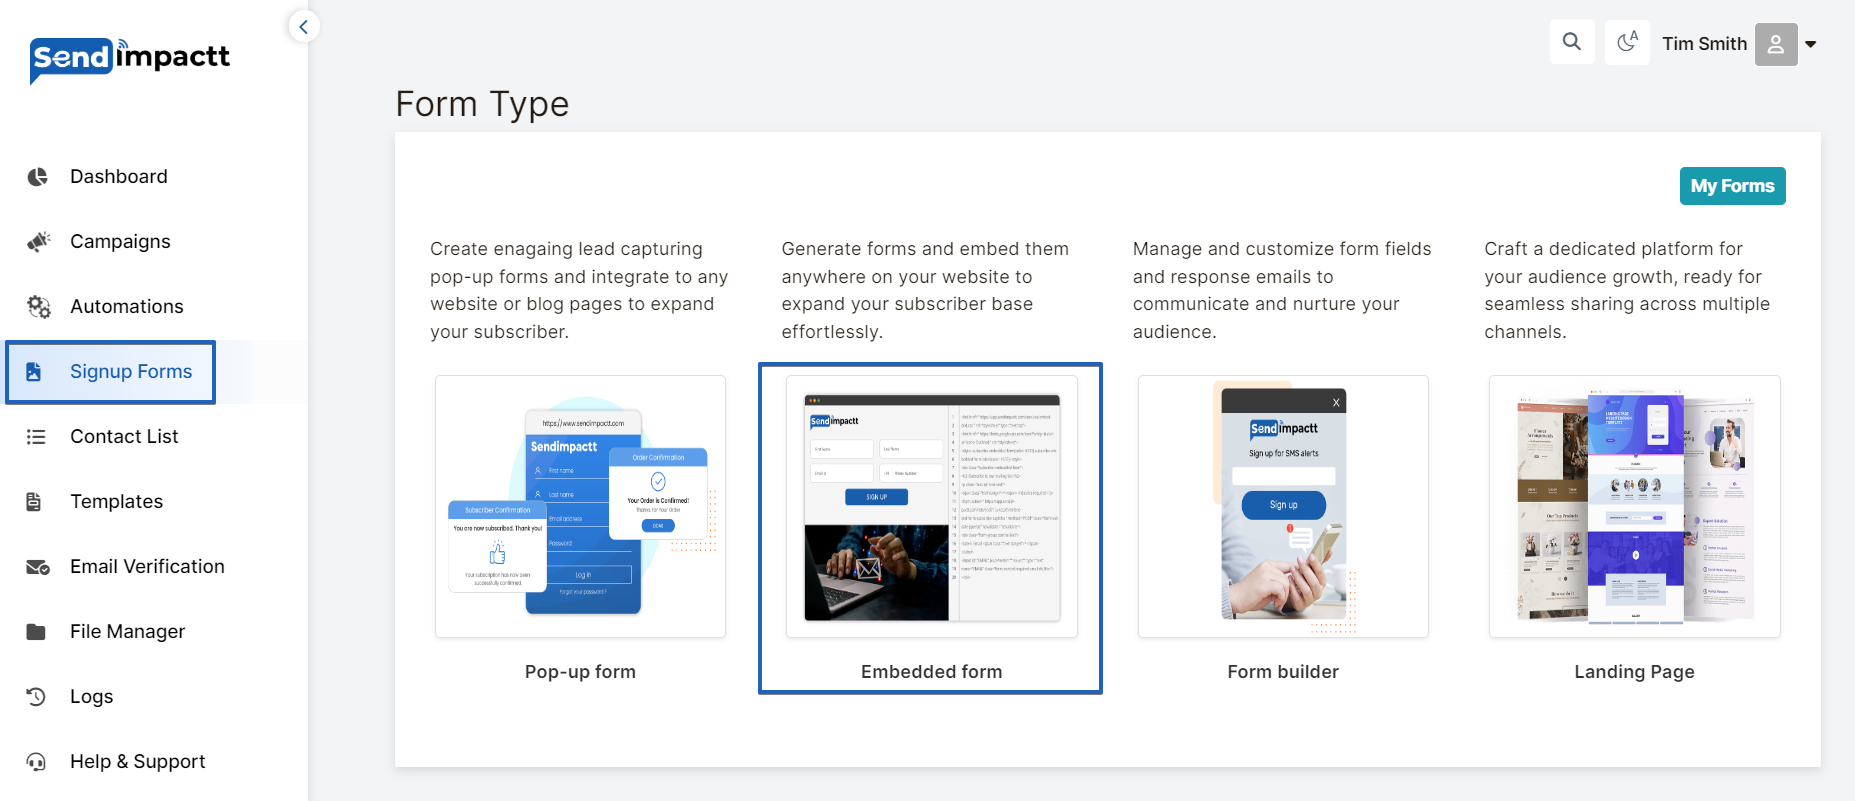
- Provide a name for your form & “Select a mail list”
- Then inside the options you can adjust the following:
- Form title
- Custom redirect url
- Custom CSS
- You also get the option to include or exclude the stylesheet.
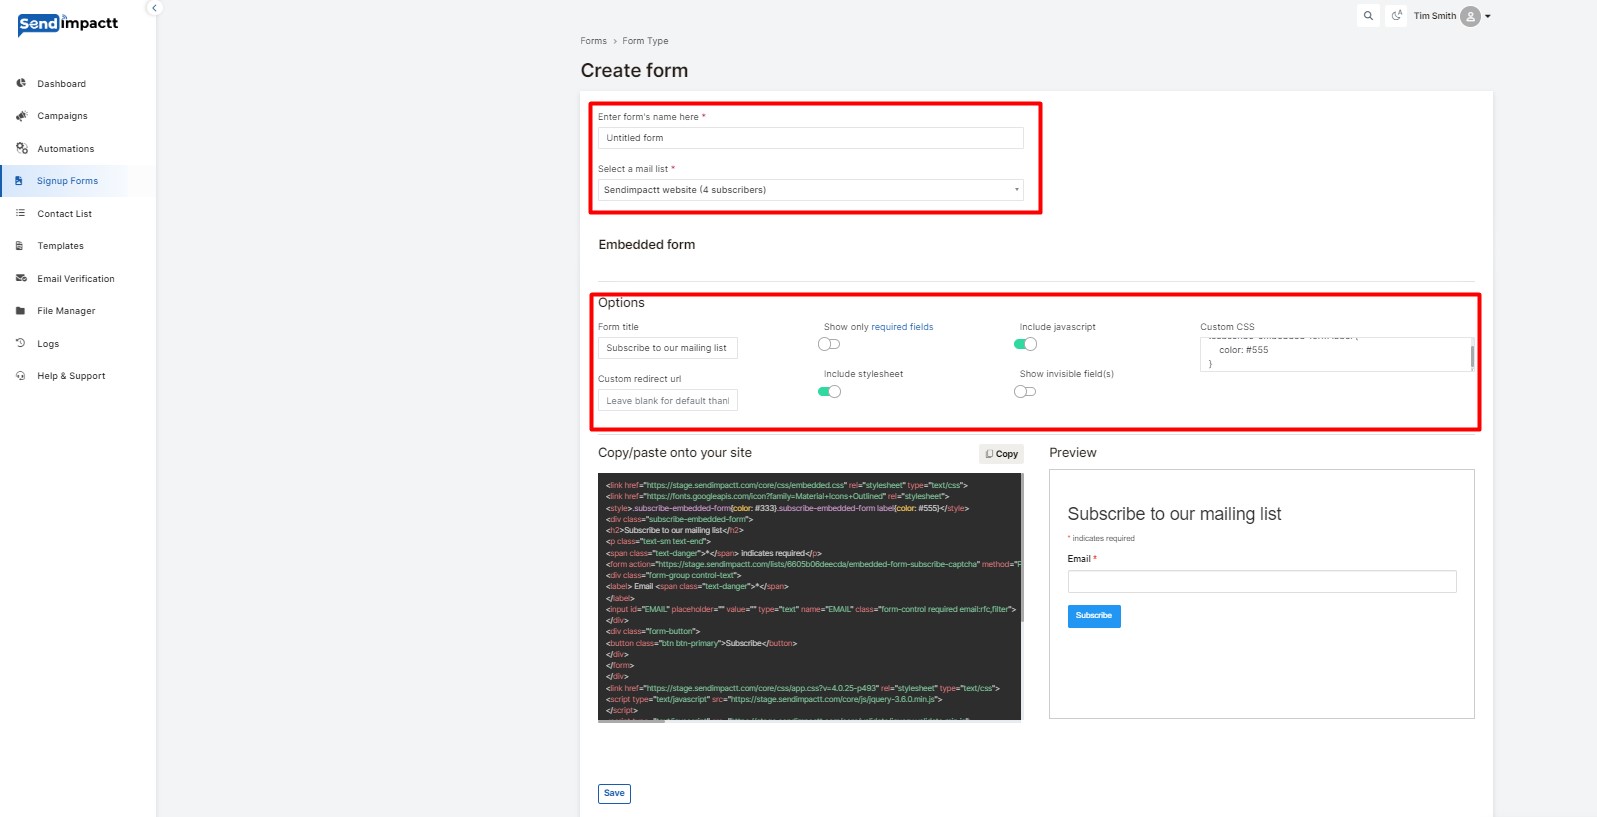
- Copy the entire code and paste it in the relevant section of your website.
By following these steps, you can create an embedded form tailored to your specific needs, seamlessly integrating it into your website for efficient lead generation and audience engagement.
Get started with automations
How to create an automation workflow
To create an automated email look at the following instructions.
Here we will take an example of creating automated birthday email campaign in Sendimpactt, follow these steps:
- Add a Birthday Field:
- Ensure that you have a birthday field in your Sendimpactt contact list where you’ll store the dates in MM/DD format. If you don’t have this field yet, you can add it to your signup form to collect birthday information from contacts.
- If you already have birthday data, make sure it’s stored in the correct format (MM/DDYYYY).
- Create an Automated Birthday Campaign:
- Log in to your Sendimpactt account and navigate to the Automations section.
- Click on the “Add New” button.

List of Automation Triggers in pop up will appear
Choose HAPPY BIRTHDAY trigger:

After Selecting the Trigger point fill out all the information asked in the next pop up
Say happy birthday
Before: Select the Day on which you need to send the automation, You can send upto 5 days before the actual event.
Time : Select the time on which you need to send the automation
List: Select the list on which you want to run the automation

On the next page kindly fill up the campaign name:
You will enter the automation editor page;
You can change the settings if required
And set the campaign throughout the page
Click on + sign

Choose the action from the list

Design Your Email or Email Series:
Fill out all the information as we do it in email campaign
- Set up the email
- Design
- Confirm

Click on go back button.
- Enable:
- After designing your emails, previewing, and testing them, ensure that your workflow settings are configured correctly.
- Review the checklist to make any necessary changes.
- Click “Enable” to launch your automation.
- Confirm the start of your automation in the pop-up modal.

- Birthday Email Tips:
- Personalize your emails using merge tags.
- Consider offering promo codes or special discounts to encourage purchases.
- Send a series of emails to provide extra reminders and well wishes leading up to and after the subscriber’s birthday.
- Monitor your automation report to track its performance and revenue generation.
- You can pause and edit your automation anytime to make changes as needed.
By following these steps and tips, you can create an effective automated birthday email campaign in Sendimpactt to engage your subscribers and encourage them to celebrate with you.